

How To Change The Antifreese In A 010 Toyota Corolla
Toyota Corolla Coolant Change Guide
How to drain and refill the coolant (antifreeze) in a 2009 to 2013 Toyota Corolla with the 2ZR-FE one.8L I4 engine.
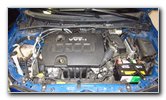
2010 Corolla 2ZR-Iron
2ZR-FE Radiator & Fans
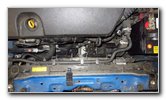
Radiator Bleed Plug
Performing a affluent of the coolant system is Non recommended since it will be impossible to achieve the correct ratio of 50% coolant to fifty% distilled water in the cooling system.
Owners of other Toyota, Lexus or Scion vehicles such as the Yaris, Matrix, Prius, 86, Camry, RAV4, Sienna, Tacoma, Tundra, FJ Cruiser, Venza, C-HR, Highlander, Avalon, Sequoia, State Cruiser, Allion, Premio, Auris, IS 250, ES 350, GS 350, tC, xB, xD, iQ and FR-S may likewise find these DIY instructions to exist helpful.
The recommended OEM (original equipment manufacturer) coolant type is the pinkish colored Toyota SLLC (super long life coolant l/fifty pre-mixed) which can last up to 100,000 miles.
I chose to instead purchase the very pop culling Zerex Asian Vehicle antifreeze coolant made past Valvoline which is besides a pre-mixed blend of fifty% coolant and 50% distilled h2o.
The total fluid capacity of the cooling system for the 2ZR-FE 1.8L I4 engine is 5.8 U.S. quarts (5.5 liters or iv.viii Imperial quarts).
Draining the radiator volition just remove about i gallon or 4 quarts of erstwhile coolant. So you volition only need to buy a ane gallon canteen of new coolant.
If you programme on also draining the overflow bottle, I recommend buying a 2nd gallon of coolant. It probably takes about a quart to fill the overflow bottle to the "FULL" line.
The items you'll need to complete this procedure include a used oil catch container and an automotive funnel.
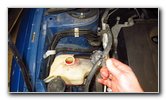
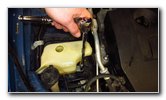
I would also recommend removing, flushing out and cleaning the coolant overflow tank. To detach the canteen, you lot'll need a 10mm socket with an extension bar and a 1/4" or 3/8" drive ratchet.
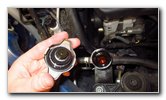
Since our Corolla is 10 years old with 95,000 miles, I chose to supplant the plastic drain plug (also called a drain cock or petcock), the small prophylactic o-ring gasket for the plug and the radiator cap.
I was concerned that subsequently thousands of estrus cycles the plastic bleed plug would pause upon removal, the rubber o-ring on the plug would tear and the rubber gaskets on the cap would exist deteriorated or rotted which could all lead to coolant leaks and perchance overheating in the future.
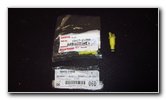
The OEM part numbers are as follows: Bleed Plug - Toyota 16417-21280, Drain Plug O-Ring - Toyota 16492-21050 and Radiator Cap - Toyota 16401-20353.
The outset few steps are to bulldoze the motorcar on to a level surface, shift the transmission into "Park" and turn off the ignition.
Engage the emergency / parking brake and place bicycle chocks on both sides of the rear tires to foreclose the vehicle from moving.
![]() Permit the engine to absurd off for at least a few hours! Do not perform this process on a hot engine!
Permit the engine to absurd off for at least a few hours! Do not perform this process on a hot engine! ![]()
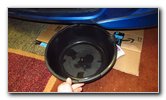
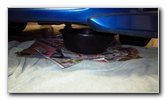
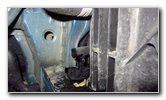
Slide Nether Catch Bowl
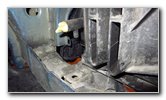
Nether Drain Cock
Slightly Loosen Petcock
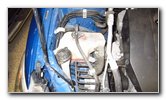
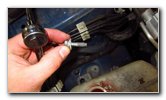
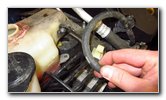
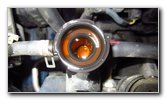
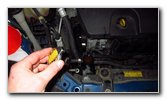
Locate the yellow plastic drain plug at the bottom corner of the radiator below the 12V automotive bombardment.
Slide the used oil catch container to just beneath the radiator drain cock.
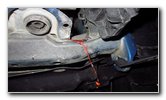
Slowly and gently loosen the radiator drain petcock in the counterclockwise direction until a small stream of one-time coolant starts flowing out of the valve on the bottom of the drain tube.
Slowly Draining Old Fluid
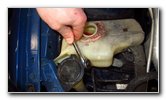
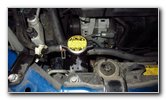
Twist Off Radiator Cap
Radiator Cap Removed
Do NOT remove the radiator cap if the engine is hot!
Only remove the radiator cap when the engine is cold to forbid from having steam or hot coolant spray into your face or on your hands.
Removing the cap will help forbid a vacuum from forming and permit the old coolant to drain out faster.
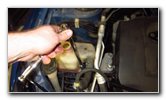
Cheque the status of the rubber seals on the old radiator cap. If the rubber looks damaged, rotted, torn or stale out, the cap should be replaced.
The genuine OEM part number for the radiator cap is Toyota 16401-20353.
Avoid buying an aftermarket radiator cap. I've read numerous stories of aftermarket radiator caps leaking.
Old Coolant Draining Out
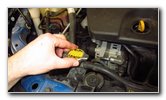
Check Sometime Rubber O-Ring

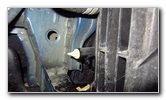
Radiator Drain Pigsty
Once the flow slows downward to just an occasional driblet, fully remove the drain plug past twisting it out in the counterclockwise direction.
This would be a practiced time to check the radiator hoses for any cracks, rotting or damage.
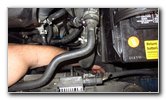
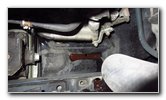
If you would like to replace the thermostat every bit well, it is located nether a plastic cover fastened to a big radiator hose just below the alternator and to the right of the water pump caster. You lot'll need a 10mm socket and a i/4" or 3/8" drive ratchet to remove the 2 nuts that secure the thermostat housing to the front end of the water pump.
The OEM thermostat part number is Toyota 90916-03144 (also known as part # 9091603144).
If you supercede the thermostat, you volition need more than coolant to re-make full the cooling system since some coolant will drain out of the water pump and engine cake.
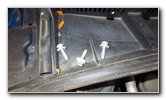
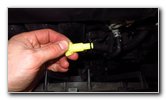
New Plastic Drain Cock
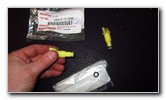
OEM Radiator Plug
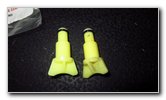
New Vs. Old Drain Plug
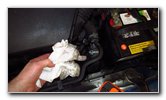
If the plastic looks deformed and croaky or the safe o-ring is torn or damaged, the parts should be replaced to forbid a coolant leak.
The rubber o-band function number is Toyota 16492-21050.
The plastic drain plug role number is Toyota 16417-21280.
My old bleed plug and its rubber o-band appeared to exist in good condition merely I'grand glad I purchased new parts for the extra peace of heed on long route trips.

New Radiator Cap
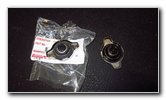
New Rubber Gaskets
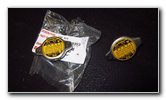
Peak of New OEM Cap
The condom seals on the sometime cap did look a bit plain-featured and dried out.
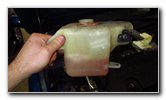
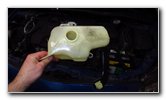
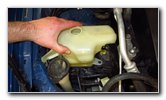
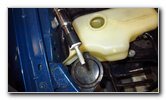
Coolant Overflow Bottle
Remove Plastic Cap
Rubber Hose Removed
(If y'all only drain the radiator, y'all'll need about one gallon to re-fill information technology.)
Pull off the plastic cap and remove the condom hose from the reservoir tank.
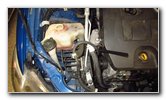
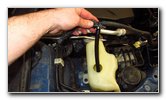
Loosen Bolts
Beginning Bolt Removed
Second Bolt
Remove third Commodities
Three Bolts Removed
Pull Hose Off Bracket
Old Coolant In Reservoir
Fluid On Plastic Covers
Advisedly lift the reservoir tank out of the engine bay.
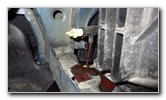
Make clean Under Engine Cover
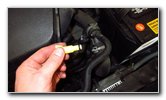
New Plug & O-Ring
Clean Radiator Drain Hole
You could also try gently shaking and squeezing the large coolant hoses to remove a bit more coolant.
Make clean off whatsoever debris from the drain tube on the bottom of the radiator assembly.
If y'all purchased a new o-ring and also a new bleed plug, advisedly push button the new o-ring into place on the tip of the plug.
Install New Drain Plug
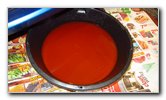
Coolant At 95,000 Miles
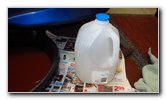
Empty Gallon Water Jug
Try to avoid over tightening the plug to prevent from bang-up the plastic or damaging the rubber o-ring.
The old coolant in our 2010 Corolla looked really proficient later on 95,000 miles. The almost important reason for performing a drain and re-fill during the 100K mile service is to renew the corrosion inhibitors in the coolant.
Since the coolant becomes more acidic over time and the rust inhibiting additives lose their effectiveness, replacing virtually of the former coolant can help protect the h2o pump, radiator, thermostat, radiator cap from corroding (rusting).
If your old coolant is full of debris or looks cloudy, take the organization serviced past a professional. The cooling organization might need to exist thoroughly flushed out or their might exist oil leaking into the coolant.
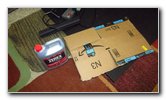
To measure how much old coolant you drained out, utilize an empty gallon h2o or milk jug.
Fluid From Radiator
Empty Overflow Bottle
Flush Out & Clean
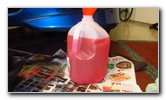
Since I spilled a small amount of coolant on to the newspapers and cardboard box I placed below the engine bay, I estimate that I drained about 3.75 to iv quarts of old coolant. The gallon canteen only filled upwards to merely over iii quarts when I emptied the catch basin.
When I poured the old coolant from the reservoir bottle into the gallon jug, it reached to the very meridian.
Utilize a garden hose to flush out any droppings or trace amounts of former coolant from the overflow / expansion bottle.
Shake out all of the tap water from the bottle earlier re-installing it.
Lower In Plastic Bottle
Bolt Taped To Socket
Tighten Clockwise
I chose to loosely attach the bolts to my socket with some electrical tape to prevent them from falling down into the engine bay.
Supercede Front Right Bolt

Tighten Front Left Commodities
Lower In Suction Hose
Try to avoid over tightening the bolts to prevent from cracking the plastic mounting brackets.
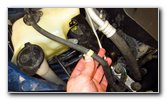
Lower the coolant recovery vacuum hose into the canteen and snap the cap into identify.
Popular Tube Into Prune
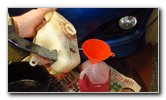
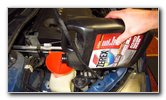
Zerex Asian Coolant
Clean Automotive Funnel
As I mentioned earlier, I had a new 1 gallon bottle of Zerex Asian Vehicle Coolant and likewise about another quart of Zerex coolant in an old canteen from a previous bleed and refill procedure done on another car.
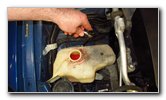
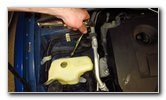
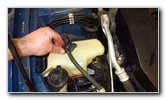
Lower a make clean and small automotive funnel into the reservoir canteen.
Fill Overflow Bottle
Supersede Hose & Cap
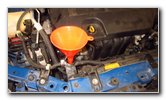
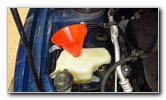
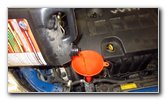
Funnel - Radiator Fill Hole
Practice not fill the canteen all the way up to "Total" to let some space for expansion when the coolant and engine are hot.
Replace the hose and plastic cap.
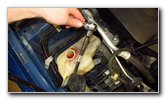
Movement the plastic funnel to the fill hole in the elevation left of the radiator.
Slowly pour in new coolant until the level reaches the height of the radiator filler neck.
(Note - In Canada, the Toyota SLLC sold at dealerships has a ratio of 55% coolant and 45% deionized water with a minimum operating temperature specification of -44 degrees Fahrenheit / -42 degrees Celsius. The higher coolant / antifreeze content is to help foreclose freezing in the colder Canadian climates.)
Pour In New Coolant

Start ane.8L I4 Engine
Plow On Oestrus - Max Fan
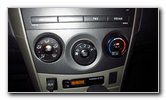
Start the engine, move the A/C temperature control to the hottest setting and rotate the blower fan knob to the maximum setting of "four".
Engine Warming Up
Coolant Level Dropping
Fill Coolant To Top
Yous may notice bubbles escaping from the radiator filler neck.
Very carefully and slowly pour in more new coolant as the level in the radiator filler neck drops down out of sight.
Once the level stops dropping after a few minutes, turn off the ignition.
Don't let the engine run for any longer than necessary to drain air out of the system. There is a small gamble that the coolant will expand and offset spilling out of the radiator filler cervix.
Twist On New Cap
Small Amount of Coolant

Coolant Alter Complete!
I nevertheless had a pocket-size amount of new coolant left in the bottle.
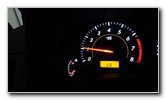
Take the car for a short examination drive and keep an centre on the temperature judge.
If you come across the needle quickly moving upwards from "C" (Common cold) towards "H" (Hot), turn the heat on total boom and head back to your home.
Once the engine is COLD, check the coolant level in the radiator and peak it off if necessary.
Yous may non need to cascade in the entire gallon of new coolant for the level in the radiator to reach the filler neck depending on how long you drained out the quondam coolant.
Be sure to check your driveway, parking spot or garage flooring for drops of coolant which might indicate a leak from the bleed plug or the radiator cap.
During the next few days, be more enlightened of the movements of the needle on the temperature gauge when you lot are driving specially when in end-and-go traffic or on the highway.
The temperature gauge needle should consistently remain somewhere in the middle of the range between "C" and "F" equally you are driving.
I would also recommend that you double check the level in the radiator first thing in the morning when the engine is cold and superlative information technology off with boosted coolant if necessary.
Don't forget to write downwardly the coolant alter in your vehicle'south service records.
The service interval specification in the owner'southward transmission for irresolute the coolant is 100,000 miles.
If you live in an extremely hot climate, drive for a ride-sharing service such as Uber or Lyft or you tow with your Corolla, it would exist wise to change your coolant more ofttimes such as every sixty,000 or even every 30,000 miles.
Please be sure to clean up any spilled coolant since it tastes sweet and is toxic to both animals and children.
Accept the sometime coolant to your local hazardous waste collection center to exist recycled or bring it to an auto parts shop, a mechanic's service station or your dealership.
For more, check out my other Corolla DIY tutorials at the links below -
2009-2013 Toyota Corolla Repair & Maintenance Guides
2014-2018 Toyota Corolla Repair & Maintenance Guides
2003-2008 Toyota Corolla Repair & Maintenance Guides
(Notation: I am not a registered charity. Donations are non tax deductible.)
Source: https://paulstravelpictures.com/2009-2013-Toyota-Corolla-Coolant-Change-Guide/index.html
Posted by: taylorwarorinced44.blogspot.com
0 Response to "How To Change The Antifreese In A 010 Toyota Corolla"
Post a Comment